Storyboarding is very important is software design, especially when it comes to iOS app development. There are many out there who might not be aware of this until now. That is why, before I begin talking anything about the more important things that app developers need to keep in mind, let’s begin by introducing you to storyboards first.
Storyboards
Storyboards are a powerful approach when it comes to making a visual representation. It has long been used in designing visual contents for movies to decide where a particular sequence should be appropriate for a particular screen or what kind of emotions should the characters express. Storyboarding makes imagination of visual production easier. And since apps are all about visual interaction, developers too can benefit by understanding how the transitions between various screens will work.
It also helps you to realize the major goals that you want your application to accomplish. It tells you what you need to do next.
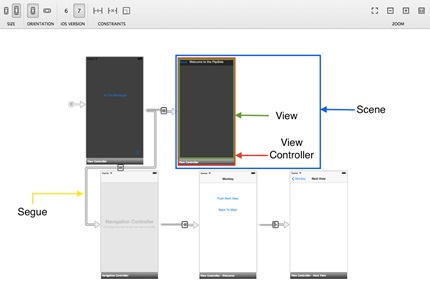
A storyboard is represented by two things – a scene and a segue.
A scene refers to a view controller or a single view. Each scene consists of a dock for making an outlet and connections between the view and the view controller. The views contain objects and controls that explain how a user would interact with an application.
Each of these scenes is connected with segues that show a transition between the view controllers. A segue is created between an object of an initial view and a connecting view.
To help you understand better here is an illustration as to how the design surface of an application looks like on a storyboard –
As the discussion continues, it is important to understand that in the case of an iPhone, a scene on a storyboard is equal to the screen content of a device. This, however, is different in the case of an iPad since there is a possibility of multiple screens appearing at the same time.
Stages of Storyboarding
Storyboard creation for an iOS app consists of two stages. The first stage of storyboarding includes –
- Creating a rough sketch of an application’s primary screens and menus
- Figuring out how users would be progressing through an application in order to accomplish a primary task
- Mapping out the screens and prioritizing the tasks accordingly
- Drawing the general visual proportions of the contents and the tools
All these will help you to form the big picture of your application. Now after you are done with the initial stage, comes the second stage – that is, adding the little details that will make your app stand out and bUsecome user-friendly. It includes –
- Making sure the color of an app is consistent throughout from screen to screen
- Adding the navigation, status, tab bars and tools
- Including table views, the predefined buttons, paging indicators, sliders, switches and the spinning wheels
In addition, do make sure that your mobile app has a clean navigation path that is clutter free. Do not get tempted to add numerous bells and whistles, for that will make your app function confusing leading to app abandonment.
Storyboards enable app developers to create a great user interface without turning code into a mess. Keeping this in mind, here are 10 practical points that an app developer should remember when using storyboards –
1 – Split Up Your Storyboards
It need not be only one storyboard where you put the concept of your entire app. Split your storyboard into settings, onboarding, and main board. This way, you would be able to save you from a number of headaches when your iOS app development magnifies in size. Besides, it makes interaction easier especially when discussing a project progress in a team environment.
2 – Use an Exit Segue in Your UI Storyboard
An Exit Segue helps a user to return to that place in the storyboard where a UIStoryBoard Segue action has been implemented in the first place. Here is a picture of how an Exit Segue works and is different from that of a standard segue.
Some of the steps that you need to follow when creating an unwind segue are –
- Choose a view controller that will appear onscreen at the end of an unwind segue
- Define the unwind action method that you need to choose for the view controller
- Navigate the view controller in order to help initiate the unwind action
- Initiate the unwind segue by control-clicking the button
- Drag to the exit object, located at the top of the view controller scene
- Use the relationship panel in order to select the unwind action method
3 – Get a Preview Editor
Building an iOS app and then running it can turn out to be pretty tedious. This is true when you have to deal with the auto layout. With a Preview Editor, you can modify the view and see how it reacts according to the changes that you make.
You can preview the interface design across multiple screen sizes with the help of the +button located on the lower left side of the assistant editor panel.
4 – Avoid Using Complex Controllers
Controllers help to manage a lot of subviews. However, using complex controllers can also risk you complete wrecks that help you to add views on top of one another. This can create a hard time for an app developer, especially when it comes to using the visual editor that provides a clear view of how an app has been built.
If you have a complex view structure, then there are a couple of options that you can take advantage of. Like, for example, a Zib or some other container view object. While Zib is one of the most common choices, there are certain situations where using a container view object turns out to be more effective.
If you consider adding a Zib, then you would also need to accompany a source file for initializing the Zib.
Conclusion
Storyboards are very important tools in app development and are quite effective for those who are visual. They can also help to speed up the work of prototyping. Storyboards can also save you from messing up with codes and encourage developers to start working keeping logic as the real force behind. In one word – storyboards are the driving force behind an app development.
Image Courtesy: pixabay.com